Jumping on the bandwagon, I decided to make a cardiwrap from some Carolina Herrera heavyweight viscose sweater knit I got from Emma One Sock. I bought this fabric back in February, with some type of wrap in mind so after seeing all the great versions lately (love Christina's!) I decided it was time to cut into it. This fabric is super drapey, medium-heavyweight, with a distinct knit stitch to it, and a nice sheen to the ivory color. I made a muslin from some thin rayon jersey first, and decided it would work with the weight of this fabric. What I didn't think about was the slippery-ness of it! It is so fluid and smooth when I throw it over my shoulder it falls right off. LOL Fortunately it will hold a knot, so I can tie it in the front or tie the two corners together and put it behind my neck (forgot to take a pic of that one). But my favorites for this fabric are definitely loose as is and with a belt.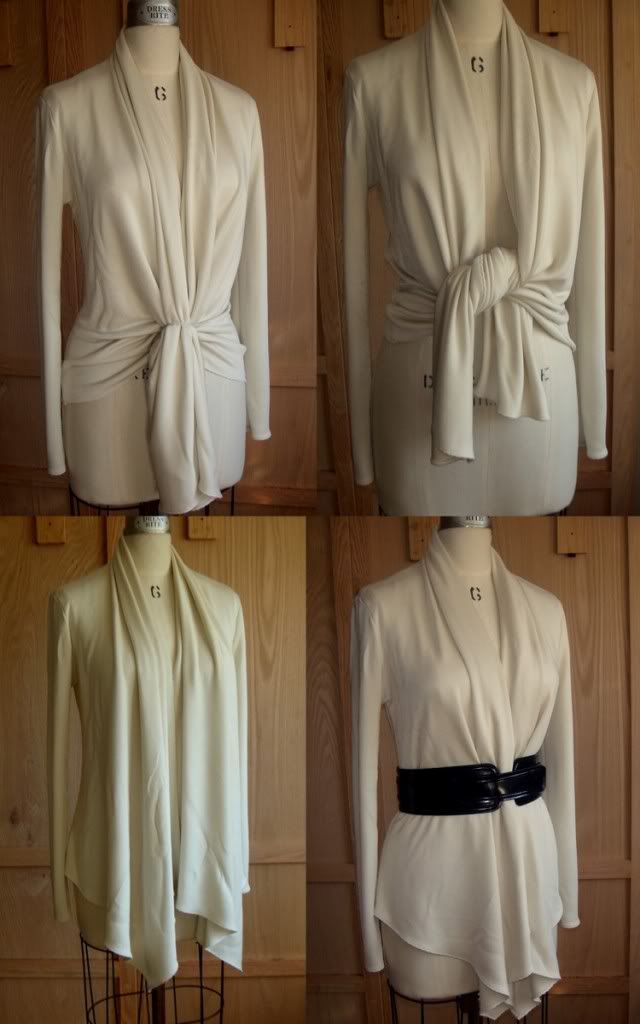
I think this pattern (Simplicity 2603) is great for the overall stylelines, the shape of the front pieces and the gathered neckline are fantastic. However when I was comparing the sleeve and armhole shapes to my TNT self drafted patterns for my knit wrap dresses, the Simplicity pieces were terrible. The sleeve cap was way too short and had way too much ease. I prefer a higher cap with stable knits, I think it lays better. I used a size XS here because, surprise, Simplicity had an inch or so of ease in the bust for a KNIT pattern. I usually use negative ease for knits, and I wanted it to fit snugly, so I sized down. I completely scrapped their sleeve pattern, and traced my own armhole onto the Simplicity pieces. I had to add to the back neckline seam to get all the seamlines to match up, but the shoulder seams were already pretty close to the right length so it wasn't too hard. I also made a full-length sleeve, it hangs to about the top of my thumb. It's so much easier to take pics on the dressform, but my shoulders are actually a tad wider and it looks better with the arm filled out. This is view C, the shorter length front.
I had a hard time trying to figure out how to finish the raw edges, most people have been making this from jerseys that can be left raw as they don't fray. This fabric doesn't necessarily fray, but it does get a bit fuzzy looking, especially after being tied and stretched. I experimented with a bunch of finishes, including several on my serger. All of them were giving me a lettuce edge effect which I didn't want for this. Finally I tried a shell stitch on my sewing machine, and it looked great and had the elasticity and recovery I needed. I was practicing on scraps first, and was a little worried that it would look old-fashioned on the actual garment, but I just love how it looks.

I think it adds something very special to an amazing fabric and a great style. It was easy to do as well, I used my blind hem foot to help me turn under an accurate 1/4" of fabric as I went, no pressing involved. I did all the edges before putting it together, I would definitely recommend this as it's much easier to do before you construct the neckline. The hems can be done after you serge the side seams. I also set the sleeves in flat, and stitched in the ditch at the neckline to secure the neck piece and cover the elastic.
Oh and want a tip for using a decorative stitch, or any stitch really, on a hem? Before you try to stitch over those side seams, trim off a little bit of the seam allowance, fold it under and press with your iron, then take a hammer and pound it flat. Yes a hammer. I believe they sell 'sewing hammers' made of plastic, but I use a regular old hammer and it works just fine. You want to get the bulky side seam as flat as possible to make it easier for your machine to pass over the area, and believe me a hammer does a much better job than your iron. Try it. But watch your fingers. Not that I've ever whacked mine while trying to hold the fabric in place. :-) I forget where I heard this tip, but it was probably at Fashion Incubator. Thanks Kathleen.
An olive green merino top
1 week ago
1 comments:
Anonymous
said...
Finishing the edges with the shell stitch makes it look rich...expensive. Great idea!!!
Post a Comment